Theory of Orthographic Projections
Theory of Orthographic Projections
INTRODUCTION
An engineer, who may be a designer, drafter or builder, is always confronted with the task of describing the shape of three dimensional objects on a two dimensional surface, e.g., the drawing paper. This may be done by a written description, photograph of the object or by graphical description.
The written description or the language of words, can be used to describe only very simple and standard solids, while the photographs can show only the exterior of an object.
Also the object to be designed or improvement of some existing design can not be photographed. Hence the only possible media, accepted universally, by which an engineer can express his/her ideas is the language of lines or the graphical description, commonly called “Engineering Drawing“, which is a systematic combination of different conventional lines.
PROJECTION . TERMS
In graphic language the shape is described by projection, which is the image of the object, formed by rays of light, taken in some particular direction, from the object into a picture plane, as it appears to an observer stationed at the point, from or towards which the projection is made.
Depending upon the orientation of the object, location of the point of sight, and the direction of lines of sight relative to the picture plane, different types of projections, e.g., perspective, parallel, orthographic, axonometric, oblique, etc., can be obtained.
The plane, on which the projection is taken is called the plane of projection or picture plane. The point, from which the observer is assumed to view the object, is called the station point or the centre of projection.In this chapter only the orthographic system of projections will be studied in detail. Other types of projections are dealt in separate chapters.
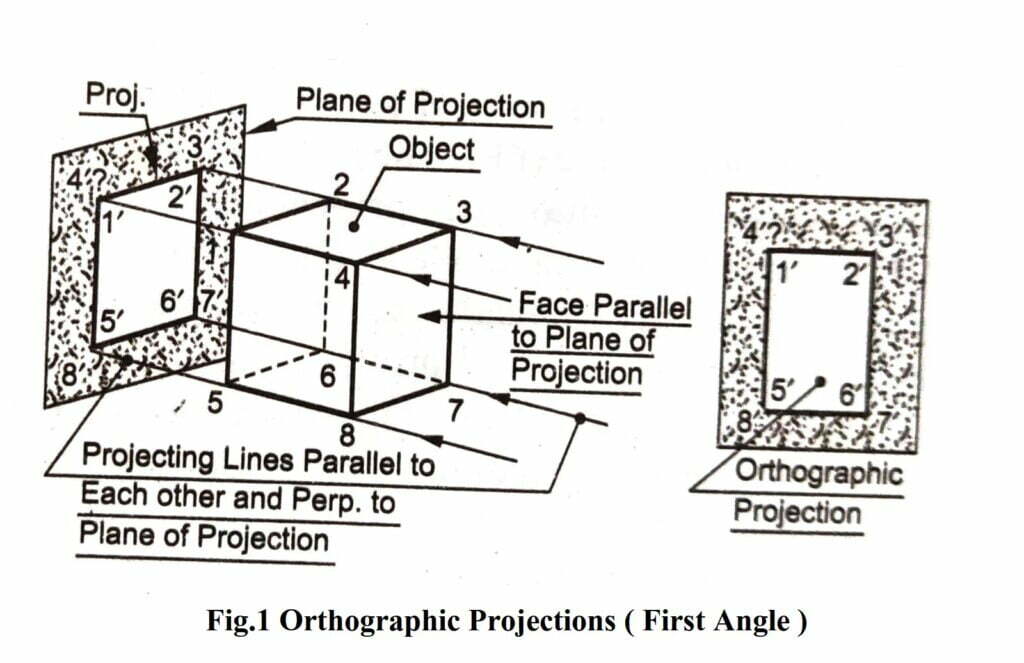
ORTHOGRAPHIC PROJECTION Referring to Fig.1, if the station point (or observer’s eye) is at an infinite distance from an object (a prism here) such that the lines of sight (or projectors) are parallel to each other and perpendicular to the plane of projection (or picture plane), the projection obtained, which would be of the same size and shape as the facing surface of the object, is called an orthographic projection. Note that the object is placed with one of its faces parallel to the picture plane.

Orthographic Projection in Hindi Click hear..
ORTHOGRAPHIC SYSTEM OF PROJECTIONS
Any object has three dimensions, i.e., length, breadth (depth) and height. The problem is to represent or convey all these three dimensions, together with the other details of the object, on a sheet of drawing paper which has only two dimensions.
Orthographic system of projections is a method of representing the exact shape of a three dimensional object on a two dimensional drawing sheet in two or more views. As is clear from Fig 1 that a single orthographic projection of a cube, or any other object, does not describe the form of the object, when the object is so placed that one of its faces is parallel to the plane of projection.
In order to achieve a complete shape description, in such cases, it is necessary to get more than one projection, and therefore, additional planes of projection are used to project more views on them, for the object. As such, the orthographic system of projections is also called multi-view projection method.
These views are obtained by dropping perpendiculars from two or more sides of the object to the picture planes, generally set at right angles to each other. These picture planes are then rabated to lie them in one plane.
This method is almost universally used in engineering drawing to graphically describe the shape of objects.
CO-ORDINATE PLANES OF PROJECTION
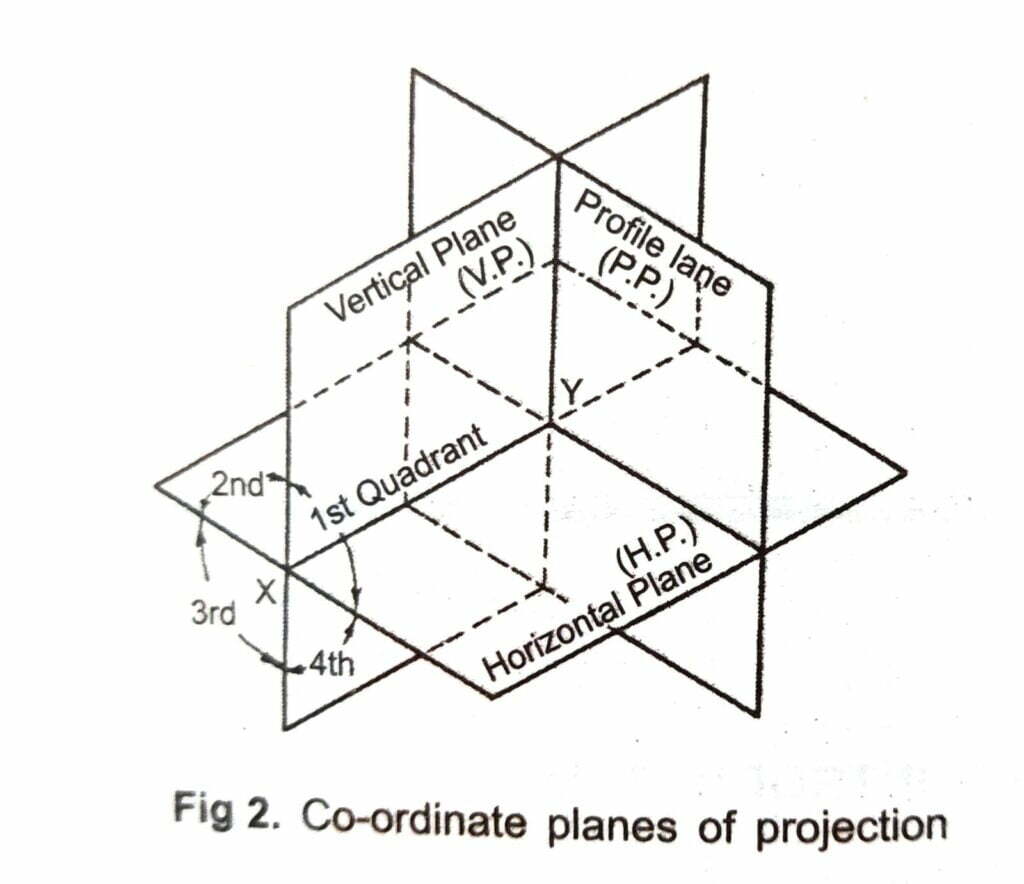
In the orthographic projection drawing, for getting the different views of an object, three main planes are usually used. One of these set up in vertical position is called the vertical plane of projection (VP) or Frontal Plane (FP).
The second plane, set up in horizontal position, i.e., perpendicular to the VP, is called Horizontal Plane (HP). The third plane, set up perpendicular to the vertical and horizontal planes is called profile Plane (PP).
The horizontal and vertical planes, which are called the principal planes, divide the whole space on one side of the profile plane in four parts, called the four dihedral angles.

Figure .2 illustrates the coordinate planes and the four dihedral angle (or quadrants). The lines of intersection of these three planes are called coordinate axes. Line of intersection of HP and VP is more commonly called “Reference Line” and is denoted by XY. The point of intersection of the three coordinate planes is called the origin.
प्रथम तथा तृतीय कोणीय प्रक्षेप में अन्तर Click hear..
SYSTEMS OF ORTHOGRAPHIC PROJECTION
Orthographic views of any object can be represented by any one of the two systems of projection, e.g., the First Angle Projection and the Third Angle Projection. These are named according to the quadrant in which the object is imagined to be placed, for purposes of projection. The shape and size of views are same in these two systems. The only difference lies in the relative position of the various views.
First angle projection (European) is widely used throughout Europe, the USSR, and many other countries in Asia. Third Angle Projection (American) is used in America. The current Indian and ISO Standards state that both systems of projection are equally acceptable but they should never be mixed on the same drawing.
Both these systems should be taught in Engineering Institutions, as these are used throughout the world, for the preparation of technical drawings. In India the use of First Angle Projection is in use exclusively after 1991.
Theory of Orthographic Projections,Theory of Orthographic Projections,Theory of Orthographic Projections,Theory of Orthographic Projections
इसे भी पढ़े…..
- What is Projection ? How many types of projection 2021
- Drawing Instruments and Conventional Lines
- Workshop & Calculation में पूछे जाने वाले बहुविकल्पिक प्रश्न 2021
- WSC 1st year MCQ Modal Question paper 2021
- Electrician 1st year MCQ in English & Hindi 2021
- ITI 2nd Year Electrician Theory Objective Question 2021
- Diesel MCQ Question and Answer in Hindi 2021
- वेल्डिंग के 100 महत्वपूर्ण प्रश्न उत्तर
- NCERT Note Book
